


* * *
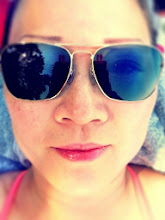
MAGIC HOURS = WARM, DEWEY GLOW
 |
| Photo shot early in the morning, when the sun was very low in the cloudless sky. ISO 400, 50mm, f/2.8, 1/4000 sec. |
When possible, I try to schedule shoots early in the morning or late in the afternoon in order to shoot in the most flattering natural light possible. During these times, the sun is low in the sky, casting a warm, dewey glow on everything. Your subjects will appear flawless and almost other-worldly. There is a inherent quietness in portraits taken during these times that make them timeless and extraordinary.
* * *
FULL SUN = BACKLIGHTING
 |
| Photo shot around 10:30AM in full sun. ISO 200, 50mm, f/2.8, 1/2000 sec. |
Before I picked up my first dSLR and learned the tricks of the trade, I loooved shooting in full sun in the middle of the day. I thought: "I'm getting beautifully saturated colors and everything looks happy and bright." Now I think: "Ugh, this sun is too bright, my subjects are going to look like Dracula, with intense, black shadows all over their faces." The truth is, shooting in full sun that is high in the sky does give your photos the best color vibrance and saturation. This is because in bright light, you can set your ISO very low (200 or even 100 on a crisp autumn day), which will give you the best possible color saturation. However, on the flip side, you now have an intense light that highlights every flaw, increases contrast, and casts horribly unflattering shadows.
Instead, try shooting INTO the sun, with the back of your subject to the sun -- hence the term backlighting. Backlighting can be tricky, but by keeping a few tricks in mind, you could achieve a beautifully colorful look without all the negatives. First, meter to the skin on your subject's cheek. Then adjust your settings for proper exposure. I'd recommend setting your ISO at 200 or 400, setting the f-stop at 2.8 or 4.0 for a creamy background bokeh, and a very fast shutter speed to compensate for the low ISO and f-stop values. Sometimes, when you shoot into the sun, you will get a dreamy, hazy look across the image. Most people love this look; but if you like a cleaner, sharper look, shoot into the sun, but make sure that the sun itself is actually not in the frame.
* * *
CLOUDY / OPEN SHADE = EVEN LIGHTING W/O SHADOWS
 |
| Photo shot around 10:30 AM in full, open shade. ISO 400, 50mm, f/2.8, 1/200 sec. |
Believe it or not, a cloud-covered day is a natural-light photographer's friend. A cloudy day allows you to shoot outdoors in the middle of the day without harsh shadows. The light filters through the clouds and is distributed evenly across the environment. If you have to shoot outdoors in the middle of the day, a cloudy sky could be your friend. On the other hand, if you are shooting on an extremely sunny day, look for shady areas that are completely in shade (full open shade) -- meaning, no dappled spots of sunlight filtering through leaves that could cast strange shadows onto your subjects. Preferably, your shady spot is surrounded by light-colored walls or cover that will act as reflectors that will bounce even, natural light onto your subjects. If your shady spot is under a tree, make sure you meter to the skin on your subject's cheek and expose accordingly; also, make sure you compensate during processing/editing for any green tint that may be casted onto your subject's skin from the trees/grass. Another issue to be aware of is: there may not be as much contrast as you'd like between your subject and the background, something easily fixable during processing/editing.
All of the above images were taken on-location, during a scouting trip to this year's mini session venue. We have a jam-packed day waiting for us this Saturday. I can't wait!!! If you cannot make it this Saturday and would like to take advantage of the Holiday Minis, please email me so that I could put you on a list for a possible second Holiday Mini date.
No comments:
Post a Comment